
センサ組立(arduino & xBee)
7-1.部品を用意
・ユニバーサル基板
・XBee Series2 × 2
・XBEEの台 × 2
・抵抗 2.2k ×2, 10k ×2, 20k ×2
・コンデンサ 0.3u,0.1u.33u
・3.3vレギュレータ
・LM35 × 2
・電池ホルダー(9v用か単三4本か単四4本)
・青色LED × 2
7-2.組み立てる
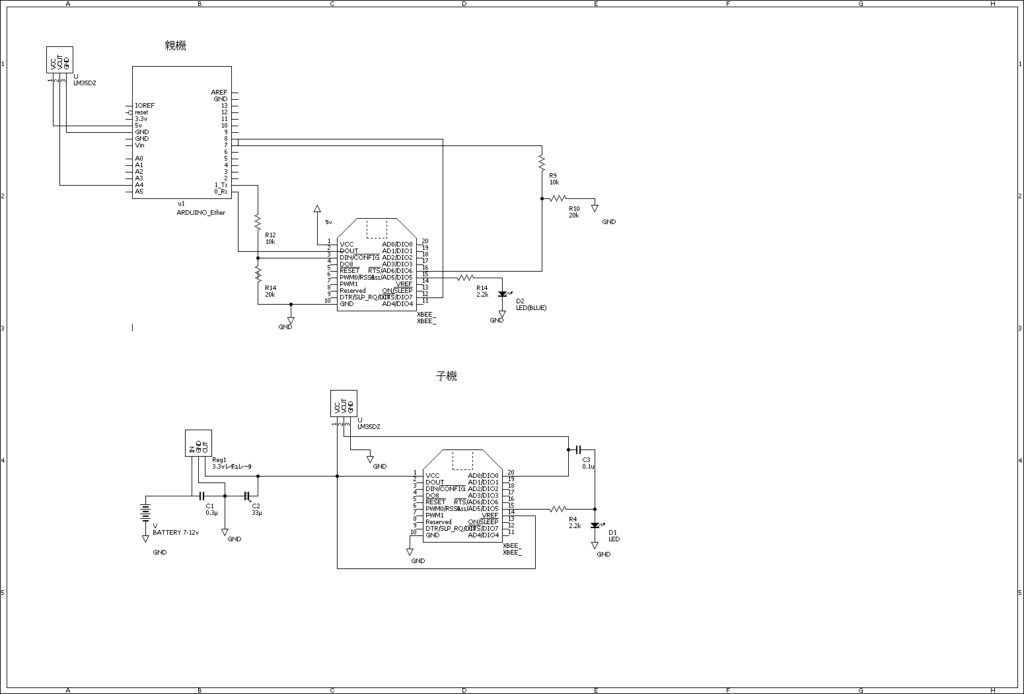
秋月のXBee台座は3.3vのレギュレータが入っているのが、3.3v入れても動いた。
子機はArefと兼用にするので3.3vレギュレータを入れている。
arduino 7,8番ピンからxbeenのRTS,CTSにつながるのはとりあえず要らない。
7-3.無線設定
arduinoに接続のxbee(親機、コーディーネータ)
PAN IDは任意の番号
modem configurationタブ Function set をZIGBEE COORDINATOR API
Serial Interface AP = 2
サンプリング用xbee(子機、エンドデバイス)
PAN IDはコーディネータに合わせる
DH:0013A200
DL:上のコーディネータのid(裏のシールの番号)ST=7D0
SN=D0
SP=20
D0=2
IR=7FF
7-4.arduino プログラム
V\https://code.google.com/p/xbee-arduino/
xbeeライブラリをインストール
#include
#include
#include
#includebyte mac[] = { 0xDE, 0xAD, 0xBE, 0xEF, 0xFE, 0xED };
char server[] = “remote.自分のURL”;// Set the static IP address to use if the DHCP fails to assign
IPAddress ip(192, 168, 0, 177);
EthernetClient client;XBee xbee = XBee();
ZBRxIoSampleResponse ioSample = ZBRxIoSampleResponse();
XBeeAddress64 test = XBeeAddress64();
void setup() {
Serial.begin(9600);
xbee.setSerial(Serial);// start the Ethernet connection:
if (Ethernet.begin(mac) == 0) {
Ethernet.begin(mac, ip);
}
// give the Ethernet shield a second to initialize:
delay(1000);}
void loop() {
float temperture ;
xbee.readPacket();if (xbee.getResponse().isAvailable()) {
// got something
if (xbee.getResponse().getApiId() == ZB_IO_SAMPLE_RESPONSE) {
xbee.getResponse().getZBRxIoSampleResponse(ioSample);if (ioSample.isAnalogEnabled(0)) {
int readData =ioSample.getAnalog(0);
temperture = readData *0.10753;
}}
}//サーバに書き込み
if (client.connect(server, 80)) {
client.print(“GET /writeData.php?temp=”);
client.print(temperture);
client.println(” HTTP/1.1″);
client.print(“Host: “);
client.println(server);
client.println(“Connection: close”);
client.println();
}delay(2000);
client.stop();
Serial.println();
delay(60000);//次の送信まで60秒あける}